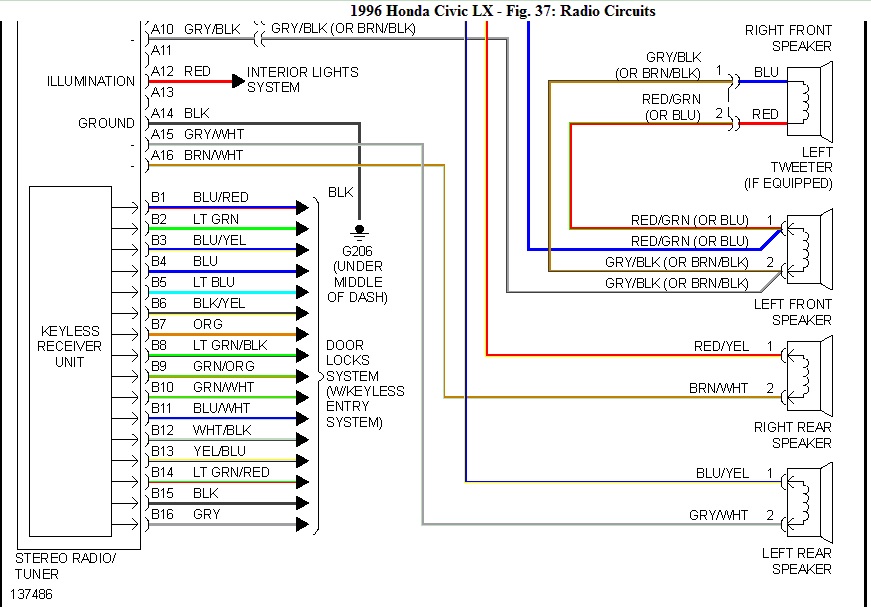
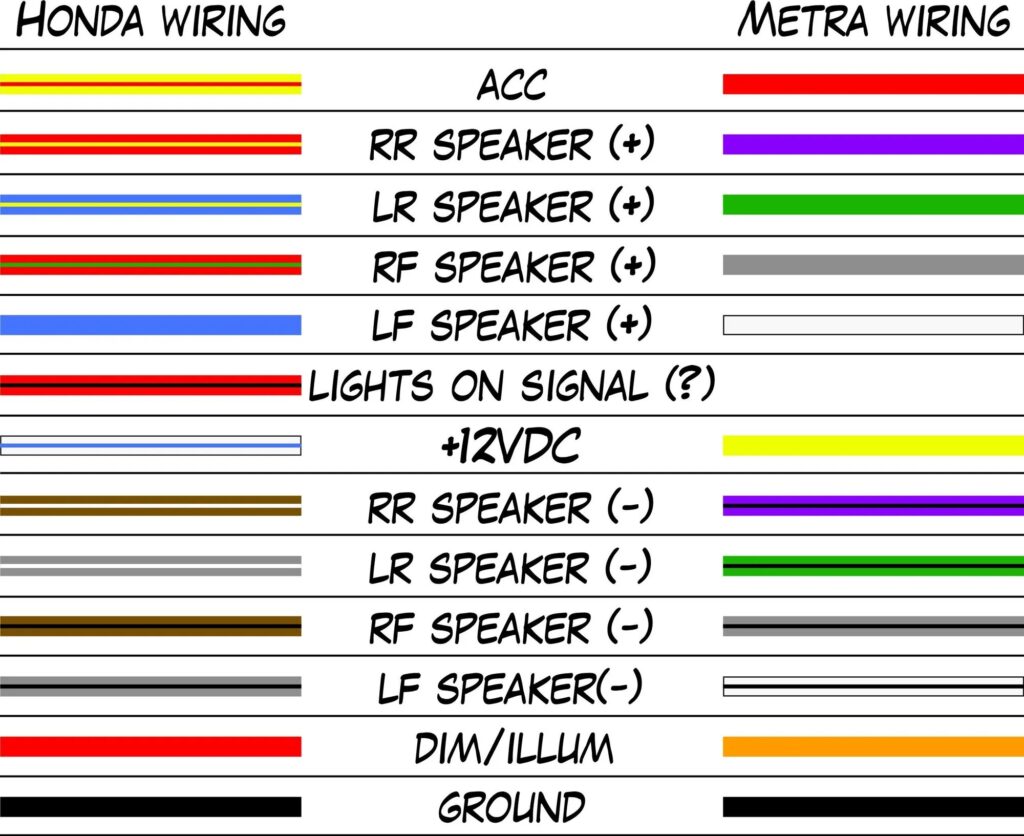
The Honda Civic has long been a popular choice for car enthusiasts and everyday drivers alike, thanks to its reliability and strong performance. One of the key elements of the Civic’s comfort and functionality is its audio system, which has evolved over the years to offer increasingly sophisticated features. Understanding the Honda Civic audio system wiring diagram is crucial for anyone who plans to upgrade, repair, or modify their audio setup. Whether you’re installing a new stereo, adding speakers, or simply troubleshooting, knowing how the audio system is wired will help you get the job done.
Basic Components of the Honda Civic Audio System
The Honda Civic’s audio system consists of several key components, including:
- Head unit (stereo or receiver): This is the central control unit of the audio system, which includes controls for the radio, media players, and volume adjustments. In newer models, the head unit may also control navigation and Bluetooth functions.
- Speakers: The Civic typically comes equipped with front and rear speakers, though the number of speakers may vary depending on the model and trim level.
- Amplifier: Some models, especially those with premium sound systems, include an amplifier to boost audio power and enhance sound quality.
- Wiring harness: The wiring harness connects the various components of the audio system, providing power and transmitting audio signals between the head unit, speakers, and amplifier.

Color-Coded Wiring: What Each Wire Does
In the Honda Civic audio system, the wiring harness is color-coded to make it easier to identify each wire’s function. Here’s a general overview of the common color codes you might find in a typical Honda Civic audio wiring system:
- Power Wires:
- Yellow: Constant 12V power. This wire provides continuous power to the head unit, ensuring that settings such as clock time and radio presets are saved even when the car is off.
- Red: Switched 12V power. This wire provides power when the ignition is turned on, supplying energy to the head unit for it to function.
- Black: Ground. This wire connects the audio system to the car’s chassis, providing the necessary grounding.
- Speaker Wires:
- White/White with Black Stripe: Left front speaker positive and negative, respectively.
- Gray/Gray with Black Stripe: Right front speaker positive and negative, respectively.
- Green/Green with Black Stripe: Left rear speaker positive and negative, respectively.
- Purple/Purple with Black Stripe: Right rear speaker positive and negative, respectively.
- Other Wires:
- Blue: Power antenna. If your Civic has a power antenna, this wire sends the signal to raise or lower it.
- Blue with White Stripe: Amplifier turn-on. This wire sends a signal to the amplifier to power on when the head unit is activated.
- Orange with White Stripe: Illumination/dimmer. This wire is connected to the car’s lighting system and dims the head unit display when the headlights are turned on.
Wiring Diagram Breakdown
1. Head Unit Wiring
The head unit is the heart of the audio system and connects to various components, such as the speakers and power sources. In the wiring diagram, the yellow wire (constant power) and red wire (switched power) are connected directly to the vehicle’s fuse box to ensure proper power distribution. The ground wire (black) is usually attached to a metal part of the car’s frame.
2. Speaker Wiring
Each speaker in the Civic is connected to the head unit via a pair of wires, one positive and one negative. These are color-coded to ensure that the correct polarity is maintained, preventing distortion or out-of-phase sound. It’s important to match the correct wires when installing new speakers or upgrading to an aftermarket system. In many modern Civics, the front and rear speakers are wired separately, allowing for individual control of balance and fade settings from the head unit.
3. Amplifier Wiring
If your Honda Civic is equipped with an external amplifier, it will have a dedicated power and ground connection, as well as signal wires from the head unit. The amplifier turn-on wire (blue with white stripe) signals the amp to power up when the stereo is in use. Speaker wires from the amplifier may bypass the head unit altogether, depending on the setup.
4. Antenna and Auxiliary Wiring
Some Honda Civics are equipped with a power antenna or have provisions for adding one. The antenna control wire (blue) runs from the head unit to the antenna, signaling it to extend or retract when the radio is turned on or off.

Additionally, auxiliary input or USB ports in modern Civics may also have dedicated wiring that connects them to the head unit. These wires allow for external devices such as smartphones or music players to interface with the audio system.
Troubleshooting and Installation Tips
- Testing Wires: When working on your Civic’s audio system, it’s important to test the wires with a multimeter before making any connections. This will ensure that you’re connecting the right wires and that power and ground connections are stable.
- Proper Grounding: Always make sure the ground wire is properly connected to a clean, unpainted surface on the vehicle chassis. Poor grounding can result in interference or a weak signal.
- Speaker Polarity: Ensure that the positive and negative speaker wires are connected correctly to avoid sound distortion. Incorrect polarity can cause the speakers to sound out of phase, leading to subpar audio quality.
Understanding the Honda Civic audio system wiring diagram allows you to confidently install, repair, or upgrade your car’s sound system. Whether you’re an experienced technician or a DIY enthusiast, knowing the layout of the wiring is key to achieving a seamless installation and great sound quality.


